Latest Positions
DOT Tracking Latest Positions - videos
On this page
Introduction
Viewing all your vehicles on a map and pin-pointing a single vehicle's location are probably the most used functions of DOT Tracking. The Latest Positions screen, available on the main menu, offers a simple pin on a map for each vehicle plus a lot more.
The screen is split in to 4 sections; the DOT Tracking main menu, the Side Bar, the Options Bar and the Map pane. This guide will take a look through the 3 Latest Positions sections and get you acquainted with available utilities.
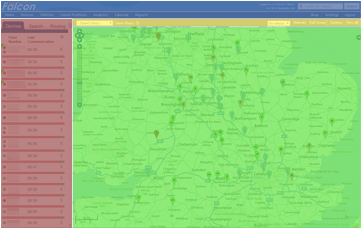
- Blue - Falcon main menu
- Red - Side Bar
- Yellow - Options Bar
- Green - Map
Side Bar
The Side Bar runs down the left hand side of the screen. There are 3 sections available using the tabs at the top; Devices, Search and Routing.
Devices
An entry will appear in the Devices list for every vehicle you have on DOT Tracking. The default view will display the vehicle registration number and the time that the vehicle last sent a GPS position fix. The 2 columns can be customised to show other information, such as a fleet number or driver name.
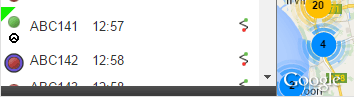
Look at a single item from the Devices list below:
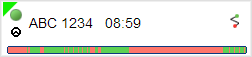
 This symbol represents the current status of the vehicle. The green circle indicates the ignition is switched on. Clicking this icon will cause the map to start "following" that vehicle, on each refresh the map will reposition itself so the vehicle is in the center of the map. Type a '?' on the Latest Positions screen to view a key.
 If the DOT Tracking unit is connected to the tachograph and the methods are supported, this shows the current mode of the tachograph. In this case, Driving.
 This icon is a link to a trail for this Vehicle.
 The device timeline.
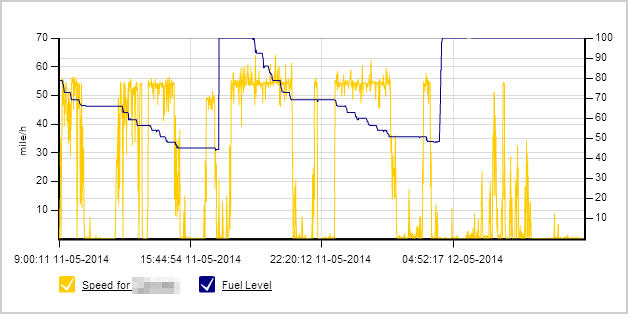
The timeline above represents the movement of the vehicle over the last 24 hours. The green areas showing any time the vehicle was moving. The timeline is also a link to a graph showing speed and, where available, fuel.
- Try clicking a timeline to see the graph:
Clicking anywhere on a device in the Device list (other than the mentioned links above) will locate that vehicle on the map, centering it on the map pane and opening the vehicle popup (see below for more details).
Search
Access Search through the 3 tabs at the top of the Side Bar. Using the Search function it's possible to find all vehicles at or close to a given location. The search bar looks like this:
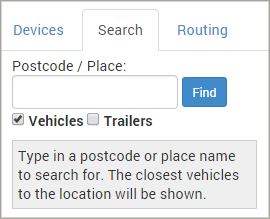
As the description states, you may enter a postcode, place name such as a town or city or you can enter a Geofence name.
- Enter a search query and click 'Find' to display the results:
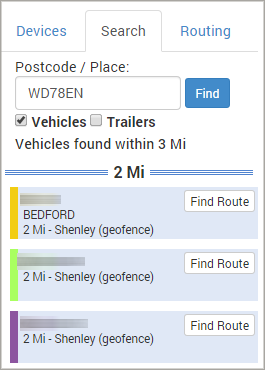
The result above have been trimmed to display just 1 result. The results are seperated at different mile markers to give you a guide as to how far away a group of vehicles are, and individually show the distance (distance is a straight line distance from the search query to the vehicle, as the crow flies).
On each result there is a link labelled 'Find Route' - clicking this will draw a route on the map between the vehicle and the search query. See Routing below for more information.
Routing
Routing is accessed through the tabs on the Side Bar. Routing on it's own provides a way to generate paths from one place to another, allowing multiple points to route and an option to optimise the route.
Below is the Routing bar:
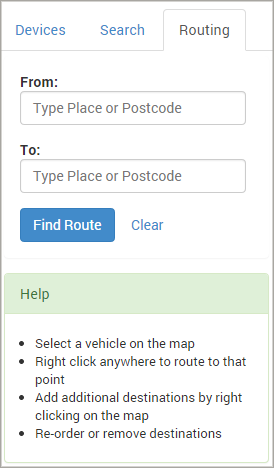
To create a simple route, enter a From and To place (postcode, town, geofence) and click 'Find Route'. The Routing bar will now display similar to the below:
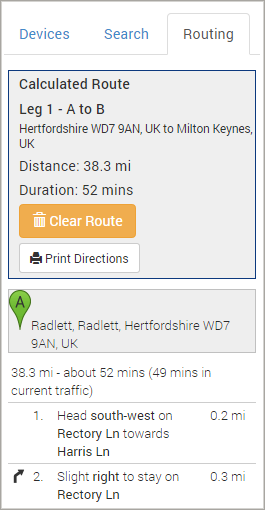
The Routing now displays the From and To locations along with the distance and estimated duration (note that this duration is based on standard car and it's speed limits). Destinations can be added by right-clicking on the map and selecting 'Add destination'.
If you have 4 or more locations in a route you are able to use the 'Optimise Route' to find the shortest route between them - while leaving the first and last locations as they are.
Below the route description are the generated turn-by-turn directions. You may open a printable version of this by clicking the 'Print Directions' button.
The route will now be displayed on the map:
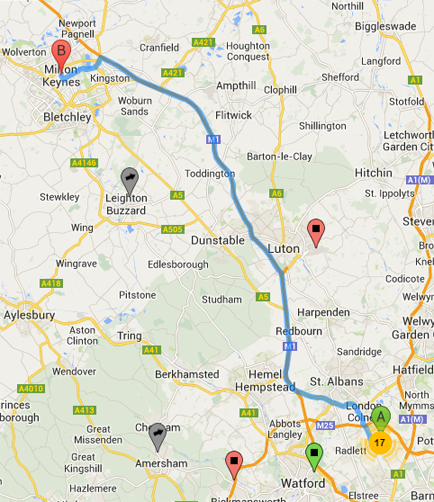
The route is displayed as a blue line between all the locations entered. Each location will have a pin that corresponds with it's leg in the Side Bar.
Another use for Routing is to find the best route from a vehicle to a given location. Follow these steps to do this:
- Click on a Vehicle on the map (a pin)
- Right-click on the map at the desired end-point of the route and click 'Route to here'.
This will fill the Side Bar with the From location as the vehicle, and the second location as the point you right-clicked. Further to this, you can now click on any other vehicle on the map and the route will re-calculate for that vehicle.
This method can be used from any point on Latest Positions - i.e. you do not need to be on the Routing tab.
Map
The Map contains a range of items:
- The base map. Configurable to be a road map, satellite imagery or a combination of both
- Map controls to pan and zoom
- Pins indicating the location of vehicles, showing ignition status, direction and other statuses
- Cluster pins indicating a collection of vehicles
- Geofences at closer zoom levels
- When in use, lines indicating proposed routes or routes taken by a vehicle.
Vehicles
Vehicles are shown as pins on the map. e.g.  and
and  . The vehicle pin will show some information from the colour and icon.
- A green pin indicates the ignition is on and if moving will feature an arrow for the current direction
- Pale red is ignition off
- Grey is a warning that the vehicle has not been seen for some time
- Yellow shows that the device is in a power saving mode - it will resume normal operation when it starts moving again
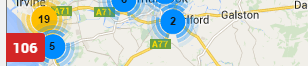
- Bright red indicates a vehicle has been in a geofence longer than the wait time set
- A blue pin with horizontal lines is a cluster of vehicles, see below.
Click on any vehicle on the map to display a vehicle popup:
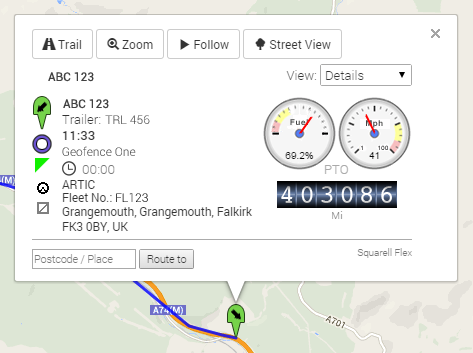
The vehicle popup opens on the Details view. Along the top of the popup are links to the vehicle's trail, a link to zoom in to where the vehicle is and a link to start following the vehicle.
There are a number of items for the current status of the vehicle, on the right hand side:
- Fuel percentage
- Speed at last GPS fix
- Power Take Off (PTO) status (highlighted when on)
- Current odometer reading.
On the left hand side:
- A column of status icons. For the screenshot above:
- Vehicle pin indicating status (ignition on) and direction (north-east)
- Geofence icon meaning the vehicle is currently in a geofence (not present otherwise)
- Trailer hooked icon
- Tachograph slot 1 and 2 - Slot one currently highlighted and set as driving
- Vehicle registration (filtered out in the screenshot)
- Description of Trailer if a trailer is hooked up (filtered out in the screenshot)
- If in a geofence the name and a timer showing the time in the geofence and the geofence wait time (if set)
- A description of the vehicle and Fleet Number (filtered out in the screenshot)
- The short description of the vehicle's location.
Change the view in the top right of the popup to Events and the view will change to something similar to this:
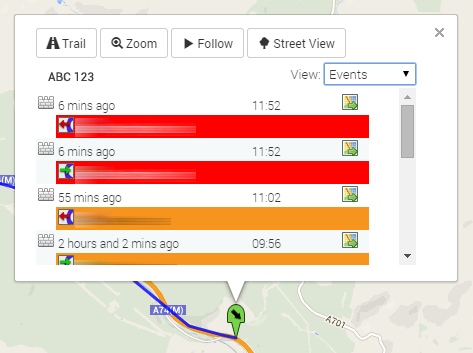
This view is a list of recent events. The events above are geofence entrances and exists, as shown by the icons  and
and  . Clicking on the map icon beside an event will hide the popup and locate the position of that event.
In the view menu you may or may not have a Trailers option - depending on what type of Falcon units you have installed. If you do, click 'Trailers' and a view like this will be shown:
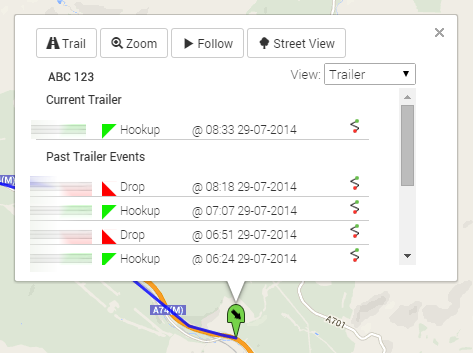
This view shows the current trailer (if any) followed by a list of past trailers and the times they were hooked up and dropped. Clicking the trail icon to the right of each row will navigate to a trail for that trailer.
**Street View**
The Street View button at the top of the popup will display Google Street View imagery for the vehicle's current location:
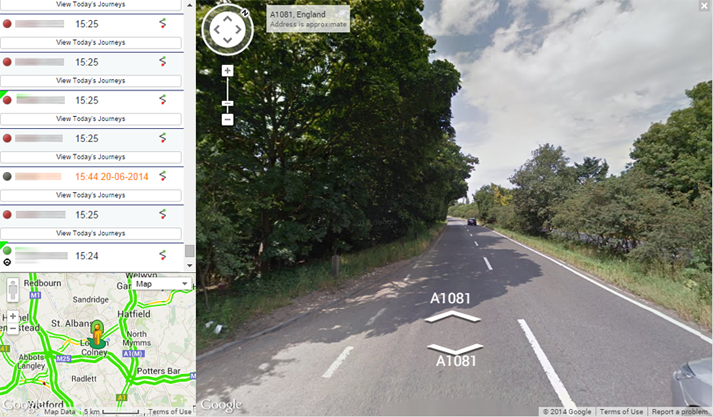
In this view there is a smaller map in the lower left corner of the screen showing your current location. You can drag the ["pegman"](http://maps.google.co.in/intl/en/help/maps/streetview/learn/pegman.html) to re-locate the current view.
Click the 'X' in the top right hand corner to exit this view, or press `ESC`.
As well as the regular vehicle pins such as and you will sometimes see markers like:
 .
This is the cluster marker and it groups vehicles that are close together in to one. The number within the marker indicates how many vehicles are there. Click on the cluster to see the vehicles within it:
.
This is the cluster marker and it groups vehicles that are close together in to one. The number within the marker indicates how many vehicles are there. Click on the cluster to see the vehicles within it:
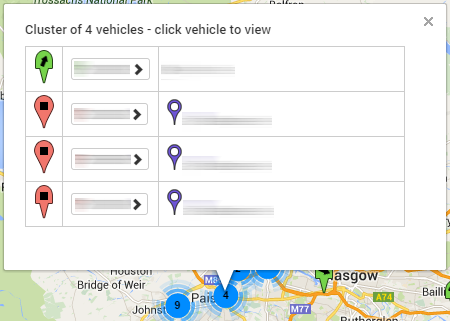
Click on the vehicle registration button to view the regular vehicle popup details.
The cluster marker will change colour depending on the number of vehicles it has grouped together; from blue with less than 10, to orange to red with more than 100.
Geofences
When enabled in the Map Options geofences will be displayed on the map at close zoom levels, zoom in until they appear if you can not see them.
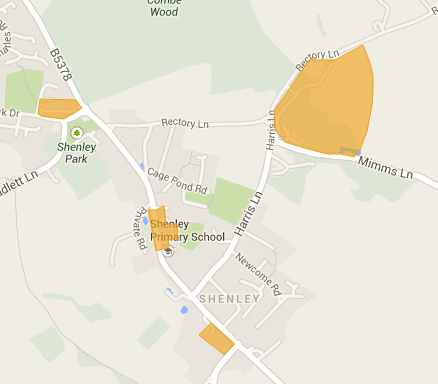
Click on a geofence to see it's name and the option to edit the geofence.
Traffic
To see current traffic conditions, right-click anywhere on the map and select 'Toggle Traffic'. This will display an overlay on roads where there is traffic information, see below:
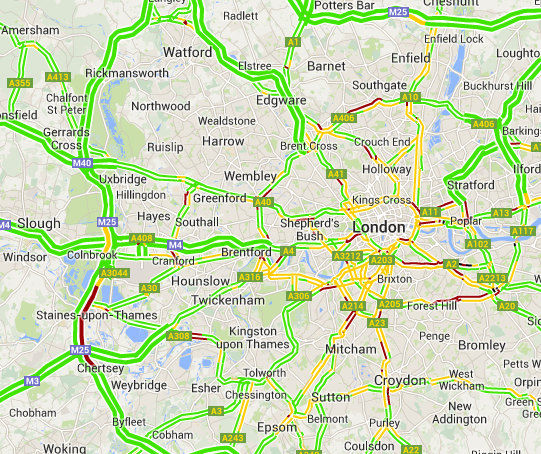
Green indicates good traffic conditions, going in to yellow/orange, red and for near stand-still traffic, black and red.
Options Bar
The Option Bar is placed across the top of the map.
On the left side:

The View options allow you to save a location and zoom level to quickly jump back to it at a later time. Pan and zoom the map to a location you wish to save and click 'Save View'. When prompted, enter a name that suits the view you want to save and click 'OK'.
The view will now appear in the drop down menu, select the view and the map will relocate to the saved position.
The right hand side of the Options Bar contains more items:

The refresh drop-down menu specifies how often the map will fetch new positions. This option is saved per user. The 'Refresh' button will force a refresh now and reset the timer for the next refresh.
Click 'Full Screen' to hide the Falcon main menu and the Side Bar. This can be useful if the map is being displayed on a wall-screen for an overview of the entire fleet.
Hovering over 'Layers' will show a drop-down list of map layers; Vehicles, Geofences, Geofence Markers and Traffic. You can switch these on or off here.
The 'View All' button will reload the positions and re-position the map to display all the vehicles on the map at once.
Click 'Options' to view the options popup window and see below.
Options
The Options are available from the Latest Positions Options Bar on the far right hand side.
- Click 'Options' to open the popup.
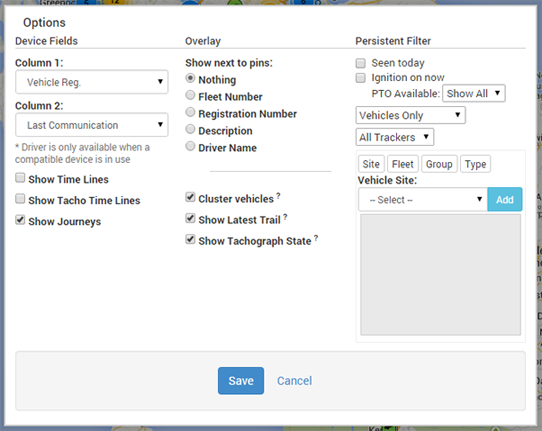
The Options are split into 3 sections:
- Device Fields that effect the Side Bar
- Overlay options that effects the pins and map and
- The Persitant Filter that effects what vehicles are displayed.
As mentioned earlier, it is possible to customise what fields are displayed in the Device list. Set Column 1 and 2 to the desired values, you may also select here whether to display the timeline and an optional Journeys button.
Set any options you wish and click 'Save' to update Lastest Positions.
Watch List
The Watch List in Latest Positions allows you to configure up to 10 filters and quickly see a count of how many vehicles are matching the criteria. You can then locate the vehicles or switch the map to display just those matching.
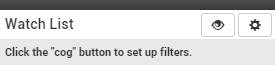
To begin, click or drag up the grey bar at the bottom of the vehicle list:
The empty Watch List will now be displayed. To configure your first filter, click on the cog button:
You will now be presented with a filter screen. Click Create Filter to start.
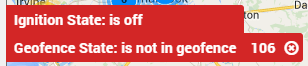
You may configure the options to match all (the default) or match any of the filters you set below. For our example we have selected to view all vehicles where the ignition is off and the vehicles are not in a geofence. Use the buttons on the right hand side to add or remove filters.
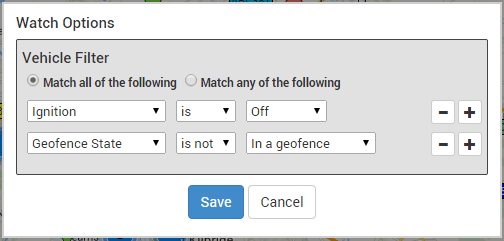
When you are done, click Save.
The active Watch List will now update with the vehicles matching your criteria:
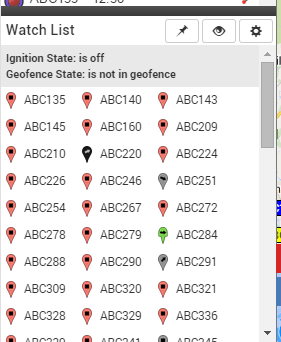
- Hovering over a vehicle will place a target marker on the map. Clicking a vehicle will relocate the map to the vehicle and display the popup information
- Above the vehicles will be the criteria you have selected. Click the eye icon to apply the current filter to the map.
If using a modern browser the pin icon will be displayed in the Watch List menu. Clicking this pin will save the active filter to the summary. This is identified by the pin icon changing in to a cross and a tab will appear along the left side of the map:
Hovering over this tab will display the filter criteria:
From here you can either remove the summary by clicking on the cross, or click the rest of the tab to make this the active filter and display matching vehicles.
You may have up to 10 summary tabs showing at a time along with an active Watch List. Each tab will appear on the left hand edge of the map, hover over each tab to see the details of the summary.
Close the Watch List by either clicking on the grey bar or dragging it down to the bottom of the screen. This will hide any summary tabs and clear any filtering from the map.
Tips
There are a few shortcut keys available on Latest Positions that can help you navigate quicker:
- Type a '?' to display a key of vehicle markers
- Type a '/' to open a quick search box. You can search for any vehicles that are on the map, geofences or places (including postcodes)
- Pressing 'ESC' will close popups, recent journey trails, open journeys and any other overlays that might be open to get you back to the base map
- Holding 'Ctrl' and clicking on a cluster of vehicles will zoom to view the vehicles within it - not holding 'Ctrl' will open the cluster list popup.